
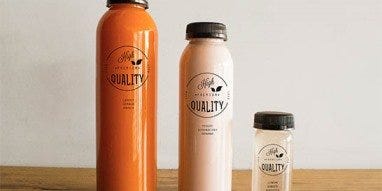
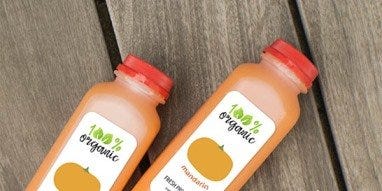
Screen Printing
Very few companies have as much experience as our decorators when it comes to screen-printing containers, which is why we can offer the lowest scrap rates in the industry. We make our own screens and mix our own inks, keeping development time to a minimum.
Although screen-printing is a common method for decorating containers, the variables are both numerous and complex. More containers are scrapped for poor adhesion than any other quality issue. Working with an experienced and trusted screen printer is the best way to minimize waste and loss, and get the results you want, on time and within budget.
The Process at BottleStore
Screen printing is a method of printing where ink is forced through a photographically treated screen onto the container to be decorated. Colors are applied one at a time, with a new screen for each color. There are many types of inks that can be used including epoxy-based and UV curable. Properly matching the ink to the materials is an area in which BottleStore excels. The artwork can also effect ink selection as does the product to be filled. Most inks require a curing process after printing; however, time and/or exposure requirements can vary significantly from one job to the next. A thorough understanding of all of these variables is critical to achieving proper adhesion and durability.
An ideal choice for:
- Plastic Bottles & Jars
- Glass Bottles, Jars & Vials
- Metal Cans & Tins
Minimum Production Orders
Screen printing pricing is based on the number of colors applied to the container – because each unique color requires a unique screen and an additional ‘pass’ through the machine. The more passes through the machine, the more expensive the project. Due to the various sizes & shapes of all the Bottle & Jars we sell; it’s hard to specify a minimum quantity of Bottles or Jars that we can decorate, but we typically live by the rule of thumb that a minimum cost for a printing order is $1000 – in addition to your Bottle and Closure costs.
Remember, that all printing services must be ordered in full case quantities.
Each printing project is unique, so it’s best to discuss the specifics with our customer service team.
Decorating How To - Let’s Walk Through The Screening Process - One Step At A Time...
 The first step is to select your packaging component & your decorating process -
- Shape and substrate material
- Decorating process
- Determine the available live decorating area (Die Line)
Think of the Die Line as the available canvas for your brand graphics - your art design team will need this information when they finalize the art for production.

YOU GO - let us know the component & deco process.
 With the component and decorating process information in hand - we’ll provide the Die Line (decorating template) in .ai and .pdf file format that shows the live decorating area of the component. Remember, this enables your art design team to design within the maximum top to bottom and front to back space limitations, and be sure the artwork is positioned correctly on the component.

WE GO - we’ll email you the Die Line information.
 At this step, you need to have your graphics/artwork completed by your art design team. They’ll produce an art file that will need to be submitted to O.Berk for review by our decorators. Don’t forget, it’s critical to have any custom colors in your design communicated in the art file. Most customers supply us with Color System swatches such as Pantone, Toyo, etc., that specify the color(s) they wish to use. Our Ink Lab will formulate inks to match not only the color, but also inks that are particularly suited to the substrate and conditions of use.
YOU GO - transfer the art files and custom color information.
- The best formats for art file submissions are:
- ADOBE CS5 (Illustrator, InDesign, Photoshop)
- Acrobat Professional 9.5.0
- Bitmaps, jpeg and tiff images generated in Work or Adobe Photoshop won’t work for this process.
- How to submit:
- CD
- Email, if less than 10MB
- If you art file is larger than 10 MB, let us know and we’ll use a drop box site at yousendit.com to transfer the file.
- The best formats for art file submissions are:
 At this stage, we’ll get to work on pre-production proofs of the processed art file. We’ll draft and route the proof via e-mail for your final review and approval.
Simultaneously, we’ll need to accomplish the screening ink color match - typically, this involves printing swatches of your color(s) on your actual component. If your components are not yet available - we can accomplish the color match process utilizing a representative bottle - as long as the resin and resin colorant is identical. We will submit 12 representative samples for your approval.
WE GO - complete and submit pre-production proofs and ink color match samples.
- Also, we’ll evaluate your chosen component for available Deco Tooling. Tooling fixtures are meant to hold a component in place when ink is being applied to the surface of the component. Often, we may have stock tooling in house for some high volume components, but we’ll definitely need to evaluate your selected package and determine if the decorator will need to have custom tooling built in order to complete your project. Custom tooling will be quoted as a separate charge on our quotes.
 This is the big step - we’ll need you to carefully review and approve each pre-production proof document with a signature and date, and return each approved document to O.Berk. We won’t be able to start production until you have approved and returned the approved proofs to O.Berk.
Also, you’ll need to review and approve the ink color match samples. We’ll have shipped you 12 for review - six are to be retained by your team, and six are required to be returned to O.Berk, signed and dated, for Q.C. monitoring. Remember, production can’t move ahead without these approvals received.
YOU GO - sign, date, and ship us the pre-production proofs & ink color samples.
- In some cases, we know that you may want to see actual pre-production samples of your decorated components. While we can accommodate that request - there is an expense involved in the line setup and pre-production run. Also, this request will require you to provide final approval within 24 hours of receiving your pre-production samples.
 Once we receive your approvals - we get to work decorating your components. Depending on the decorating site, we’ll communicate the current lead time for finished components.
WE GO - schedule production and communicate a delivery date for your final decorated components.
 Once we’re scheduled for production and the line is running, we can provide Production Samples for your use as Standards for your internal team, external partners, or as retains for future reference. Just let us know if you require these to be shipped.
YOU GO - if needed, let us know if you require retains from the production run.
Important Points to Remember
- When placing your order for your components, keep in mind that you’ll need to order more than you require for final production of decorated parts. Industry standard is 3% scrap per process -
Examples:
- 2 Pass Screen Print would have a 6% scrap allowance - 3% for each of the two processes.
- PS Labeling and 2 Pass Screen Print 9% scrap allowance - 3% for each of the three processes.
- Production volume dictates semi-automated versus fully automated screening.
- Ink adhesion is a critical consideration for the Silk Screening process. In order for the inks to adhere to the package, many plastic component materials will require surface modification by flame treating. Flame treating these surfaces prepares the surface to achieve a bond strong enough to withstand flexing, soapy water, and hands touching the ink without flaking off for the consumer. (Many of our decorators find best results when components are flamed in-house versus pre-flamed during component manufacture.)
- As a rule, our decorators subscribe to industry standard decorated testing using tape test and rub test. If your internal QA standards require more rigorous standards, that should be communicated during the initial quoting process.
- UPCs must comply with GS1 Industry Standards. For information, visit //www.gs1.org/productssolutions/barcodes/


